Role-Based Access Control is a premium feature. Without it, every user must be an Admin.
For up-to-date information on our plans and their associated features, see our pricing page.
Role-Based Access Control allows you to assign different access permissions to team members in your workspace.
Roles
Our Default Roles help facilitate better security practices while building and improving computer vision models as a team.
Roboflow supports three default roles:
- Creator/Admin - Full access to the platform
- Reviewer - Assign, review, and work on labeling jobs
- Labeler - Work on assigned labeling jobs
The Creator role is an "honorific", signifying which account originally created the workspace. It has all the same permissions as the Admin role, but cannot be transferred or reassigned.
Permissions
The permissions for these roles are broken out below:
| Admin | Reviewer | Labeler | Custom | |
|---|---|---|---|---|
| View assigned labeling jobs | :white_check_mark: | :white_check_mark: | :white_check_mark: | Optional |
| Label images | :white_check_mark: | :white_check_mark: | :white_check_mark: | Optional |
| Submit labeling jobs | :white_check_mark: | :white_check_mark: | :white_check_mark: | Optional |
| Review labeling jobs | :white_check_mark: | :white_check_mark: | Optional | |
| Assign labelers and reviewers | :white_check_mark: | :white_check_mark: | Optional | |
| Approve and reject labeled images | :white_check_mark: | :white_check_mark: | Optional | |
| Manage team members | :white_check_mark: | Optional | ||
| Upload, delete, and export images and labels | :white_check_mark: | Optional | ||
| Train models | :white_check_mark: | Optional | ||
| Build workflows | :white_check_mark: | Optional | ||
| Deploy models | :white_check_mark: | Optional | ||
| View API keys | :white_check_mark: | Optional | ||
| View Credit Usage | :white_check_mark: | Optional | ||
| Manage billing | :white_check_mark: | Optional |
Custom Roles
Custom roles is a premium feature, available to select Enterprise plan customers. Talk to our Sales team to get access to Custom Roles.
Once Custom Roles are enabled for your workspace, you can manage them from the Team Members settings page:
- Navigate to your workspace settings
- Select Team Members from the sidebar
- Click on the Roles tab
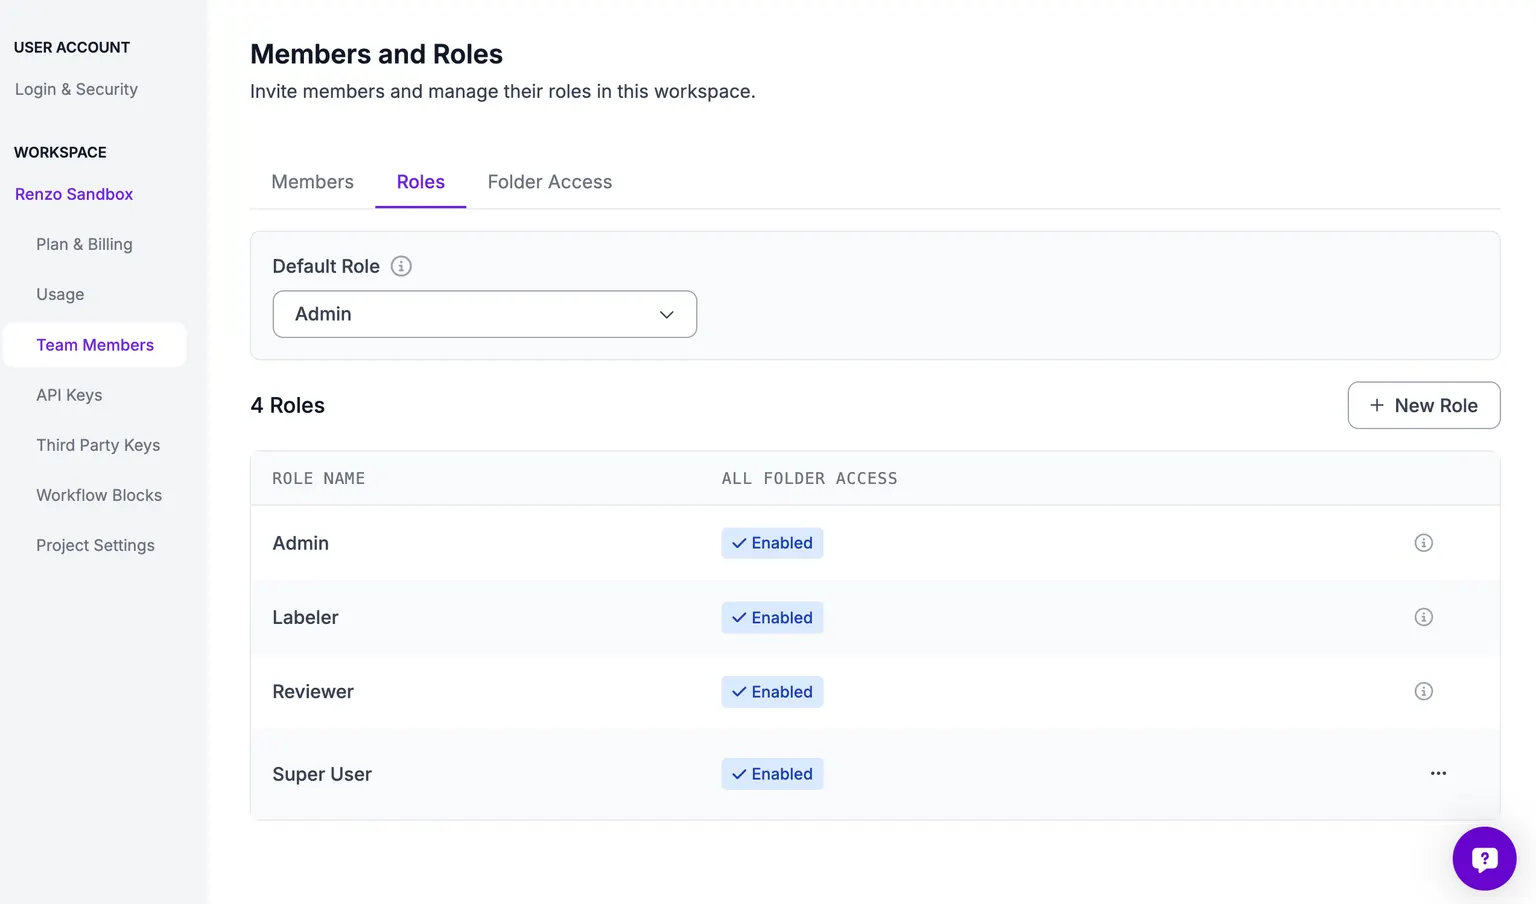
The Roles tab displays all available roles in your workspace, including system roles (Admin, Labeler, Reviewer) and any custom roles you've created:
Managing Roles
Viewing Roles
The Roles page shows:
- Default Role: The role automatically assigned to new workspace members
- Role List: All available roles with their folder access settings
- Each role displays whether it has "All Folder Access" enabled
System roles like Admin, Labeler, and Reviewer come pre-configured with standard permission sets optimized for common use cases.
Folder Permissions is a premium feature, available to select Enterprise plan customers. Talk to our Sales team to get access to Folder Permissions.
Creating a Custom Role
To create a new custom role:
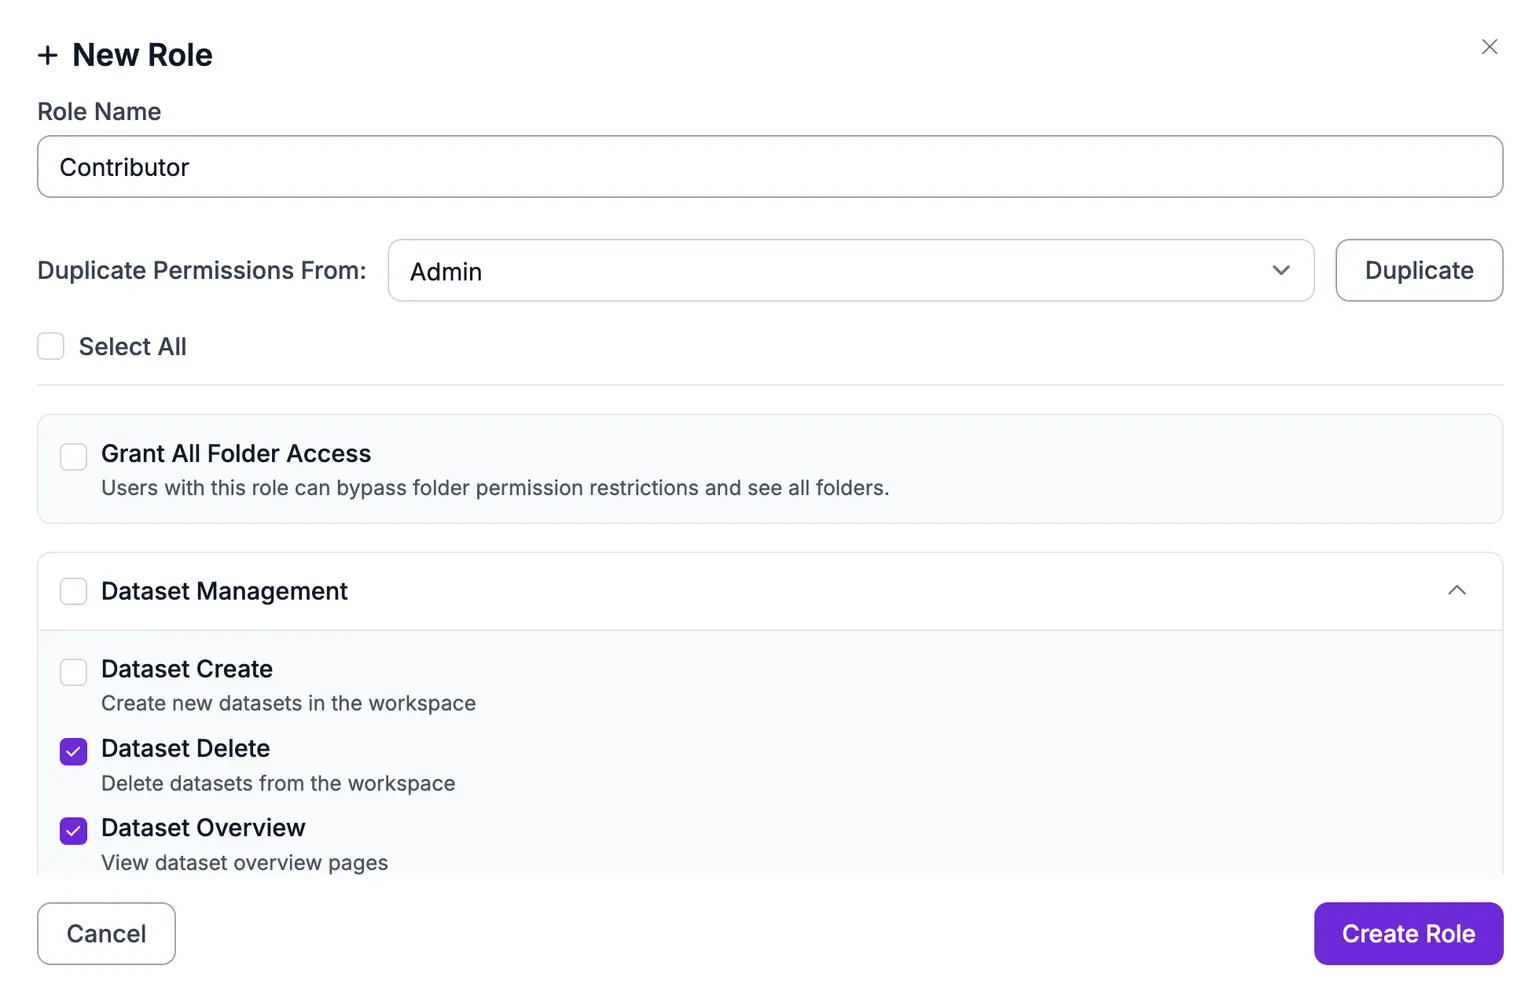
- Click the + New Role button in the top-right corner
- In the role creation dialog: - Enter a Role Name: Choose a descriptive name for the role - Duplicate Permissions From: Select an existing role to use as a template (e.g., Admin, Labeler, Reviewer) - Click Duplicate to copy the selected role's permissions
- Configure permissions by checking or unchecking options: - Grant All Folder Access: Allows users to bypass folder permission restrictions and see all folders - Permission Categories: Organized by function (e.g., Dataset Management, Dataset Create, Dataset Delete, Dataset Overview) - Each permission includes a description of what it grants
- Use Select All to quickly enable all permissions
- Click Create Role to save
Editing Custom Roles
To modify an existing custom role:
- Locate the role in the roles list
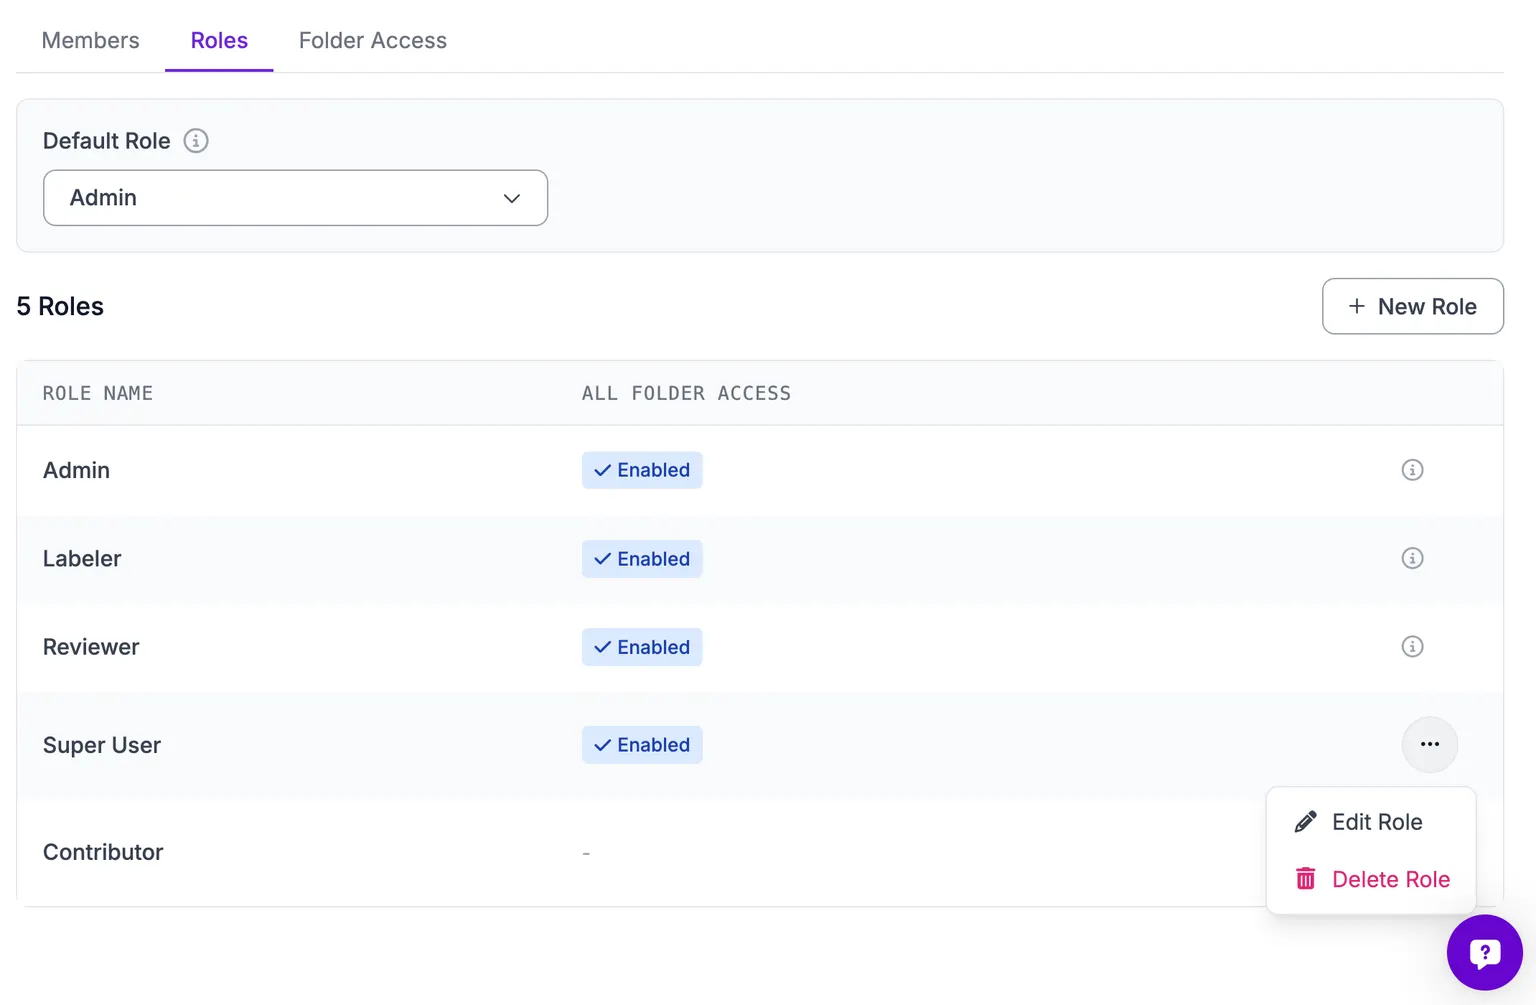
- Click the ... menu button on the right side of the role row
- Select Edit Role from the dropdown menu
- Modify permissions as needed
- Save your changes
Note: System roles (Admin, Labeler, Reviewer) cannot be edited. You can only create custom roles or edit roles you've previously created.
Deleting Custom Roles
To remove a custom role:
- Locate the role in the roles list
- Click the ... menu button on the right side of the role row
- Select Delete Role from the dropdown menu
- Confirm the deletion
Important: Before deleting a role, ensure no users are currently assigned to it, or reassign those users to another role first. System roles cannot be deleted.
Super User Roles
When using SSO group mapping, you can flag a custom role as a Super User. A Super User role grants full access to the workspace, including actions normally restricted to owners.
To enable this:
- Create or edit a custom role that has at least one SSO auth group mapped
- Check the "Super User" toggle that appears above the permissions list
- Save the role
When "Super User" is enabled, individual permission checkboxes are hidden because the role grants unrestricted access.
The "Super User" toggle only appears on roles that have an SSO auth group mapping. Use a tightly-scoped identity provider group for this role, since every member of that group receives full workspace access.
Setting a Default Role
The default role is automatically assigned to new members when they join your workspace:
- In the Default Role section at the top of the Roles tab
- Click the dropdown menu
- Select the role you want to use as the default
- The change takes effect immediately for all future invitations
Assigning Custom Roles
Once Custom Roles are configured, you can assign them when inviting team members :
- Navigate to the Members tab under Team Members
- Click Invite Members
- Choose the desired custom role from the role dropdown
- Complete the invitation or update process
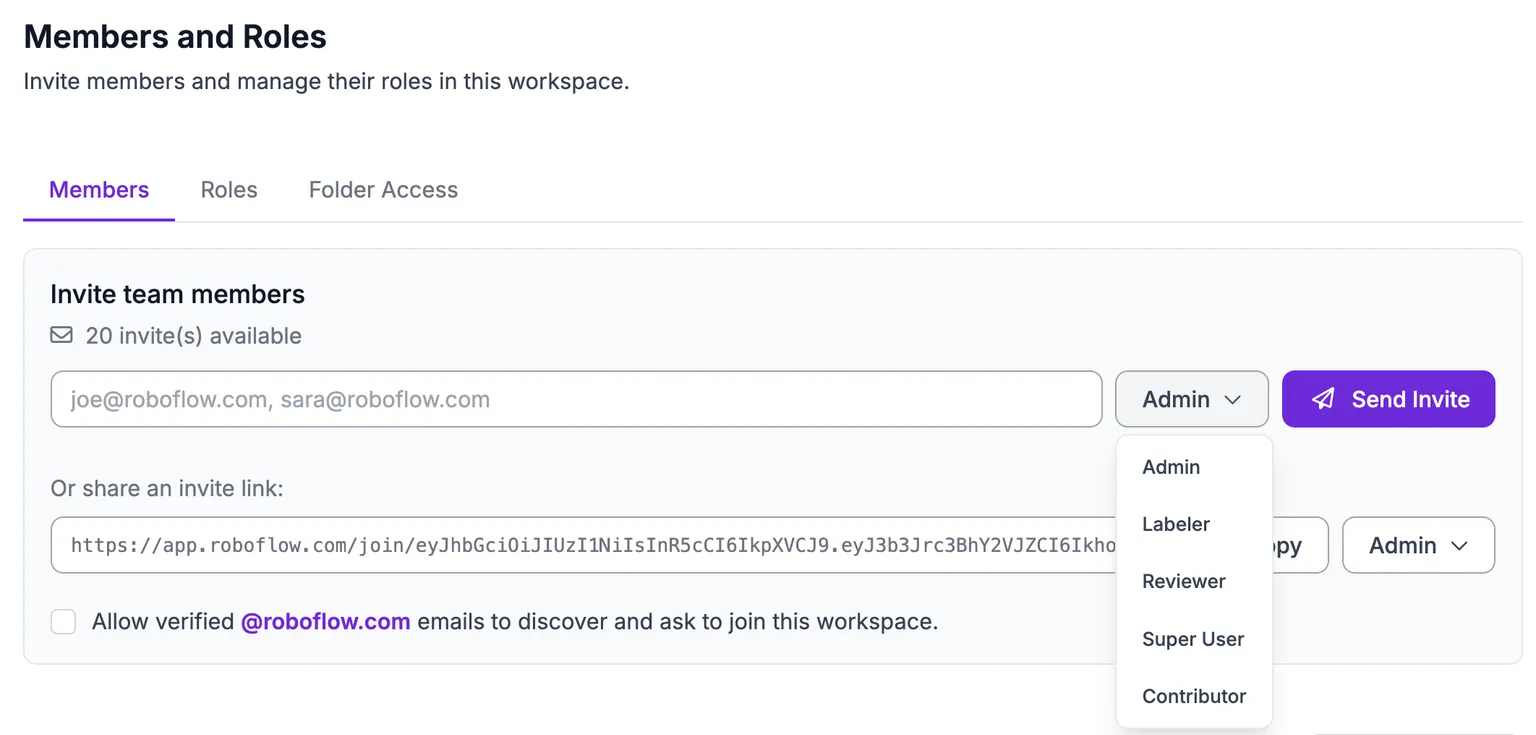
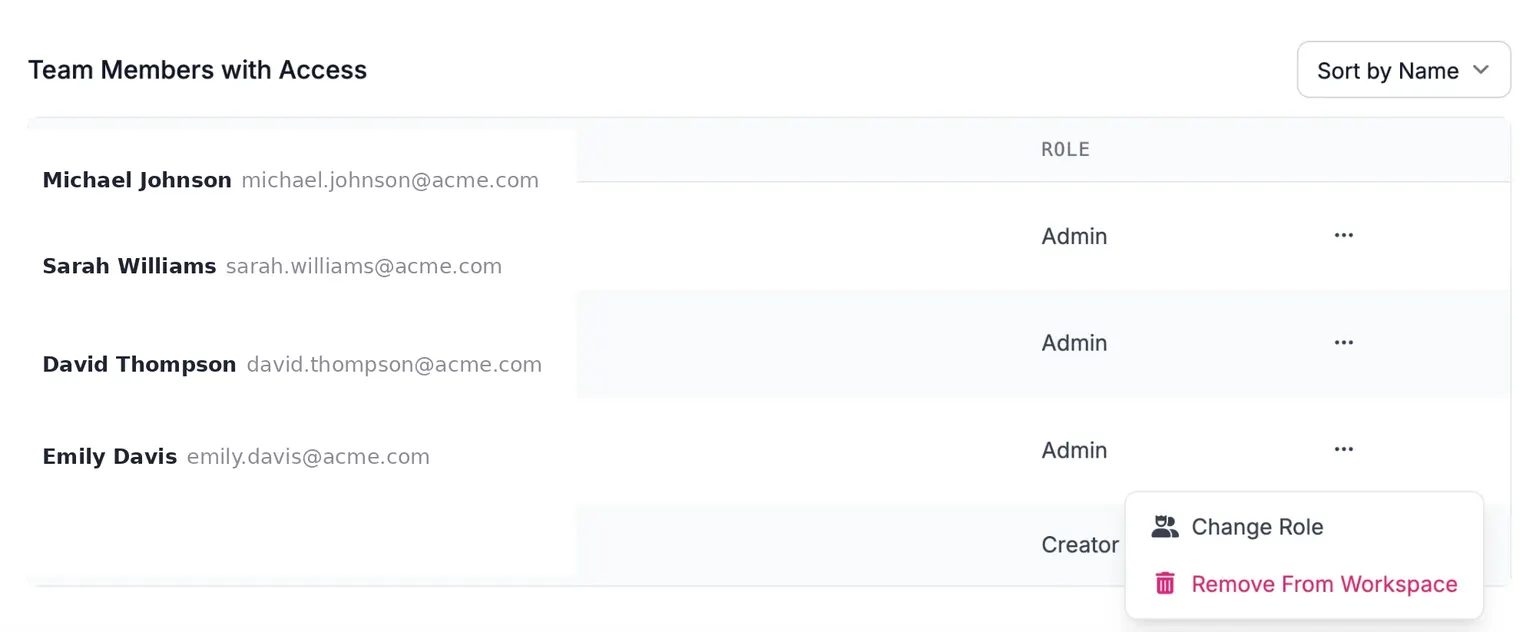
Custom Roles can be also assigned to existing members on same page:
Further Reading
For more information on team management and permissions, see:
- Inviting Team Members
- Folder Permissions
- Workspace Settings
Once Custom Roles are turned on, you can Invite Team Members as normal, specifying the Custom Role at time of invitation.